Showing posts with label GIS4930. Show all posts

Thursday, November 22, 2018

Module 4: Open Sourced - Analyze Week 1 Lab

Greetings and get ready for some more open-source software (OSS) goodness.  This week we continue to use QGIS as our main GIS desktop software and explore a few more beneficial open source resources: Mapbox, Leaflet, Color Brewer, Geocoder.

Topics covered this week are an introduction to MapBox Studio (layer hosting) and Leaflet (Web mapping), QGIS plug-ins, symbology modification, layer control, and open cage geocoder.

This week begins with using the previously created Escambia Food Desert shapefile to illustrate how to create a map symbology required for a web map.
This weeks lab is comprised of two parts:
  • Part A - create symbology and obtain the code for Food Desert data using two popular OSS resources: MapBox and Color Brewer
  • Part B - create, edit and launch a basic web map template from our student I-drive using the Leaflet framework to create a functional web map and develop skills needed to duplicate efforts for data in your chosen study area.

So what happened this week?
     • Create Map Symbology using MapBox and Color Brewer
     • Downloaded the latest (1.3.4) stable release (August 21, 2018) of Leaflet
     • Installed and explored the Leaflet Tutorials to make several web-maps
     • Obtain data for your study area and create layers in QGIS
          -food desert layer and grocery stores (required to complete Analyze Week 2 lab)
    • Review the Report Week Presentation Guidelines document closely:
          - Create a static QGIS Basemap for your location
          - Create a table of census data relevant to your study area
    • Write an outline for the Study Area section

What was learned this week?
   • How to create tiled layers with MapBox
   • How to use Color Brewer to create a color scheme to style the tiled layers
   • How to create and edit HTML web maps using Leaflet to consume MapBox layers
   • How to create a geo-coder web component and how to consume the component in a web map

In Summary

This week MapBox was used to create tile layers from geo-data modified in QGIS.  From the Food Desert layer, five styles were created in MapBox.  The color scheme was created with the help of Color Brewer.  Via MapBox, a web map template was available after publishing the tiled layers.  It included all the necessary tokens to map the initial map very easy stand-up.  A simple style was also created for a grocery store layer.  After the layers were published, the Leaflet framework was used to reference the published layers to make several web maps.  It includes all lab requirements and then some extras associated with creating a layout using some new layout code snippet from a Flexbox guide found from CSS-TRICKS, https://css-tricks.com/snippets/css/a-guide-to-flexbox/.
Hosted on Student Drive: http://students.uwf.edu/md66/m4/wk2/FoodDesert.html
Next, we'll integrate the symbology layers hosted by Mapbox.  In the meantime, I did create a template HTML page that Mapbox provides after publishing the tile layer.  Below is that simple template markup that I copied and pasted into a blank HTML web-document.  The interactive map can be found here, http://students.uwf.edu/md66/mapbox/symbology.html

http://students.uwf.edu/md66/mapbox/symbology.html
And regarding the Lecture portion of this week, I started thinking about my study area.  Since I work in Naples, FL, I originally decided on a Study Area of Naples.  However, I decided to use my local area as my Study Area, City of Fort Myers.  I searched the city of Fort Myers website and easily found a boundary file for the city and locating grocery stores was also pretty easy using Google and Bing maps.  Census Data was also an easy download from the web.  After a few Google searches, I located 2010 Tiger/Line files from the US Census Bureau website.  After a little geodata wrangling, I created two layers, food desert, and grocery store.  Then using my two layers, I quickly created a static QGIS Basemap of the City of Fort Myers.  I also wrote an outline of my selected Study Area and started planning my Food Desert analysis and project presentation.  Below is the QGIS map I created of my Fort Myers, FL Food Desert Analysis map.


Below are the same features used in the above QGIS project viewed via ArcMap with World Topo as basemap.  I just wanted to show a comparison of the two GIS desktop applications rendering the same features.

The obstacle for me this week was remembering the steps on how to do the near analysis thats starts off creating a comma separated value (.csv) file from ArcMap that is used in QGIS to establish a join that allows access to the near analysis results.  After some time of reviewing an earlier lab, I ran the tool and updated my Ft Myers census points layer to include the additional fields.  Below is what my basic Food Desert Statistics look like for the City of Fort Myers.

And below is a screenshot from QGIS of my Fort Myers Census Tracts with some added styling based on 2010 population Census data. The Green area is the Food Oasis region, which the near analysis tool marked as some value greater than -1 in a "NEAR_DIST" field.  The -1 value was an indication of a Food Desert, meaning the distance from the center (centroid) of a Census Tract was more than 1-mile to a grocery store.  The Food Desert Layer was symbolized based off a "POP10" field I created from aggregating Census Block populations for the Census Tracts that make up my study area.  Next is to create a layout project, which is similar to creating a layout view in ArcMap. 
I also need to remove some unused layers and make last minute symbology changes once I have a visualization to review.


Friday, October 19, 2018

Statistics Module 3b - Regression Analysis - Analyze Phase

During the lecture portion of this project, I learned that regression analysis is a process of analyzing one known variable against a set of independent/explanatory variables found to explain and be related to a dependent variable.  Regarding the term "regression", I associated it with the repeated sampling of explanatory variables which results in a model that best explains the dependent variable (regressing to a mean that best explains the dependent variable).  The outcome of regression analysis reports how well or poorly the model predicts the known variable and which of the statistics had the most impact on the model’s accuracy. By removing the worst performing explanatory variables and re-running the model, the underlying regression equation gets better/smarter at forecasting more reliable results that explain the dependent variable. Does Regression Analysis sound like a learning process (Machine Learning)?  It sure does to me!

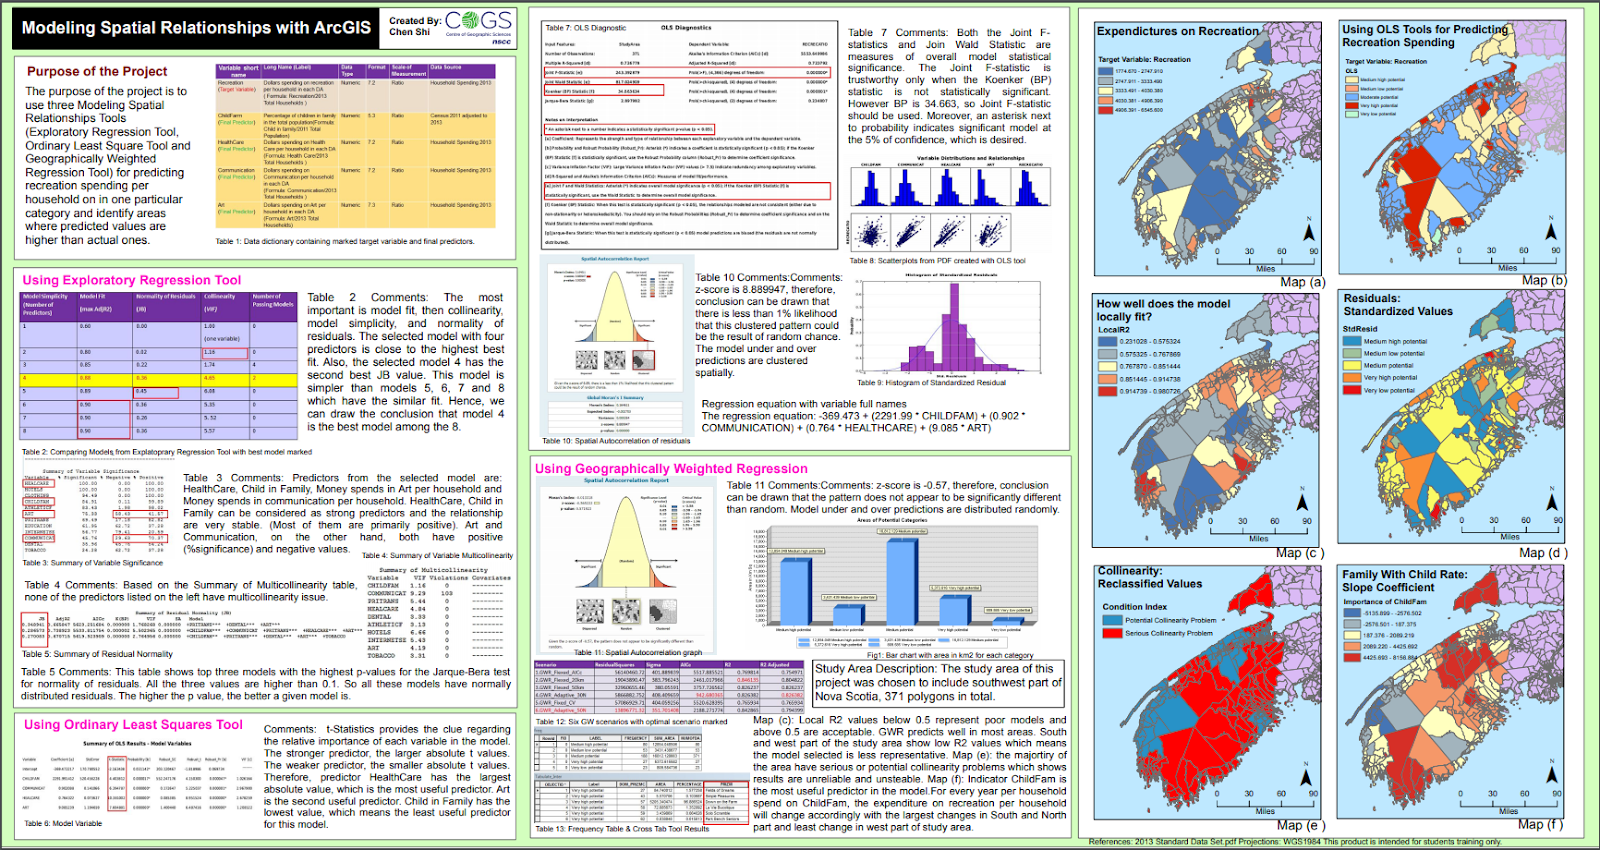
In general, the lecture material was hard for me to wrap my mind around all the moving parts associated with regression analysis.  We learned about three types of regression analysis: explanatory, Geographically Weighted Regression (GWR), and Ordinary Least Squares (OLS).  I found a nice project online that compared these three type of regression that helped me out this week.  The project is called "Modeling Spatial Relationships with ArcGIS" and it was created by Chen Shi.


What I discovered was that regardless of the type of regression, they all have in common a core concept: to examine the influence of one or more independent (socioeconomic factors) variables on a dependent (Meth Lab Density) variable.  I choose to think of regression as a line of best fit, which is a line called Y-hat.  In statistics, there is a term called Line-hat, which refers to predictions of true values.  Hence, a prediction of Y for a given value of x equates to an expression describing the best fit line through some observed/actual values.  Below is an example of a regression line:
                 Y-hat = y-intercept + coefficient(slope) of x
The above equation may look familiar.  I'm referring to the point-slope equation of a line often taught in algebra: y = mx + b  (The two bivariant variables are x (dependent variable) and y (independent variable), m is the slope (coefficient), and b is the y-intercept).  But the point-slope equation is missing a variable referred to as the error portion of the dependent variable that isn't explained by the model, which is the difference between the actual and predicted values.  The missing variable is called residuals.  Below is a vocabulary list to help explain the equation that forms the model being built by the regression method and what we learned these past two weeks:
  • Dependent variable (Y): what we are trying to model or predict (Meth Lab Density) 
  • Explanatory variables (X): variables we believe influence or help explain the dependent variable (e.g., population, education, gender, income, etc.)
  • Coefficients (ß): values reflecting the relationship and strength of each explanatory variable to the dependent variable.
  • Residuals (ε): the portion of the dependent variable that is not explained by the model (the model under and over-predictions).

Using the variables above, a simple and more informative regression equation would look like the following: Y = ßX + ε.  In actuality though, the equation is more complicated and it more resembles the graphic below.  It's the gist of what we explored this week.


During the Lab portion of this project, I learned how to leverage ArcMap's Spatial Analyst extension to reveal Spatial Statistics Tools and Toolsets to perform regression analysis.  The lab was tedious to perform; but it allowed me to run the OLS tool which showed me how to model, examine, and explore spatial relationships, to better understand the socioeconomic factors (age, income, sex, etc) behind observed spatial patterns that explained the location of 176 known meth lab seizures.  It was a mentally painful experience to really try and understand all the statistics going on in this lab.  And no real class involvement made for a poor learning experience.

The end Goal (Why) for this Project phase:
  1. Understand the core concept of regression analysis
  2. Learn about three types of regression, Exploratory, GWR, and OLS
  3. Explore how to use OLS to limit 29 variable candidates to make predictions

The Objectives (What) were as follows:
  • Perform and explore the method of Ordinary Least Squares to limit 29 variable candidates to make predictions
  • Write Methods & Results sections of a final report paper
  • Create a map showing StdResidual results from OLS model
  • Continue to learn about linear regression and establish a better understanding of this predictive type of analysis

What was learned during the last two weeks?
  • Y-hat  () = is a symbol that represents the predicted equation for a line of best fit in linear regression.
  • The equation takes the form: = a + bx, where b is the slope and a is the y-intercept.
  • Y-bar = the mean(avg) value of Y (dependent variable)
  • SSR = Σ(y-hat - y-bar)² (explained deviation)
  • SSE = Σ()² (unexplained deviation)
  • Limiting 29 candidate factors to 7 was painful!

What was challenging during the last two weeks?
My challenge this week was discovering how to limit 29 variable candidates.  More specifically, identifying my clues to interpreting the OLS results was probably the biggest issue.  Deciding which explanatory variable (EV) is to stay or be removed drove me crazy at first.  This part of the lab was demanding for me to visualize and explain.  The basic premise was easy: to show how known Meth Labs busts are dependent on some limited selection of explanatory socioeconomic factors such as the 2010 population per square mile, the Median age of males, percentage of whites, a percent of uneducated, etc..  But trying to understand the statistics behind the complex relationships involved in the regression analysis was painful for me.

What happened during the last two weeks?
The bulk of this weeks lab exercise involved exploring several checks through the use of the OLS regression tool that analyzed how 29 independent/explanatory US Census variables explained a dependent variable, Meth Lab Seizures.  The aim was to select the best 5 to 10 independent variables that explained the location of 176 known Meth Lab seizures/busts by running the OLS tool and evaluating the regression tool's OLS Summary and Diagnostic results via the guidance of the six checks, which are questions.  How well these questions were answered was the tricky part for me this week.  I removed 22 of the original 29 independent variables.  Below are the 7 best explanatory variables I selected using the six checks.


The lab combined checks 1-3 into one task that resulted in either a removing or leaving an explanatory variable based on if it helped or hurt the relationship of explaining the dependent (Meth Lab Density) variable.  Below are snap-shots of working through each of the 6 questions.  The order of answering these six questions is very important!

Question 1 - Are independent variables helping or hurting my model?
This task involved checking to see that all of the explanatory variables have statistically significant coefficients (value > 0.4).  Two columns, Probability, and Robust Probability measure coefficient statistical significance. An asterisk next to the probability tells you the coefficient is significant. If a variable is not significant, it is not helping the model, and unless I thought the particular variable is critical, I removed it. When the Koenker (BP) statistic is statistically significant, you can only trust the Robust Probability column to determine if a coefficient is significant or not. Small probabilities are “better” (more significant) than large probabilities.

Question 2 - Is the relationship between the independent and dependent variables what I expected?
This task involved checking to see that each coefficient value has the “expected” sign and not indicating a slope of zero.  A positive coefficient indicates the relationship is positive; a negative coefficient means the relationship is negative.  In the beginning, I noticed lots of high negative and positive values which I used to weigh my decision to keep the variable.  I used lower values as my clue to remove the variable.  And when considering the variable, I would ask myself, does this value seem reasonable for this variable to either increase or decrease the MLD.

Question 3 - Are there redundant explanatory variables?
This task involved checking for redundancy among the explanatory variables. If the VIF value (variance inflation factor) for any of your variables is larger than about 7.5 (smaller is definitely better), it means that one or more variables are telling the same story. This leads to an over-count type of bias. I used large VIF values to weigh my decision to remove the variable.

Questions 4 - 6 involved OLS result values seen in the OLS Diagnostic portion of the report shown below.


Question 4 - Is my model biased?
This task involved checking the Jarque-Bera Statistic is NOT statistically significant.  The residuals (over/under predictions) from a properly specified model will reflect random noise. Random noise has a random spatial pattern (no clustering of over/under predictions). It also has a normal histogram if you plotted the residuals. The Jarque-Bera check measures whether or not the residuals from a regression model are normally distributed (think Bell Curve). This is the one test you do NOT want to be statistically significant! When it IS statistically significant, your model is biased. This often means you are missing one or more key explanatory variables.

Question 5 - Have I found all the key explanatory variables?
This task involved checking the standard map output of running the OLS tool.  It's a map of the regression residuals representing model over and underpredictions.  Red areas indicate that actual observed values are higher than the values predicted by the model.  Blue areas show where actual values are lower than the model predicted.   Statistically significant spatial autocorrelation in your model residuals indicates that you are missing one or more key explanatory variables.

Question 6 - How well am I explaining my dependent variable?
This task involved checking model performance by using the adjusted R squared value as an indicator of how much variation in your dependent variable has been explained by the model.  the adjusted R squared value ranges from 0 to 1.0 and higher values are a positive indicator of performance.  I watched this value increase from -6.019018 at the beginning to a value of 0.367174 at the end.
The AIC value can also be used to measure model performance. When considering AIC values, the lower the value is a gauge for a better performing model.

Each time I would remove or re-add a variable I would reiterate through the six checks above to determine if the model got better.  This is where lots of patience is required!  ArcMap Help has an "Interpreting OLS results" page that was very helpful.

Additional Consideration - Use GWR to improve the model
When the Koeker test is statistically significant, as it is in my model, it indicates relationships between some or all of your explanatory variables and your dependent variable are non-stationary. This means, for example, that the population variable might be an important predictor of  Meth Lab Density in some locations of your study, but perhaps a weak predictor in other locations. Whenever the Koenker test is statistically significant, it indicates you will likely improve model results by using another statistical method called Geographically Weighted Regression (GWR).
The good news is that once you’ve found your key explanatory variables using OLS, running GWR is actually pretty easy. In most cases, GWR will use the same dependent and explanatory variables you used in running the OLS tool.

What's the Conclusion?

In statistic, standardized residuals (SRs) is the method of normalizing the dataset.  A standardized residual (SR) is a ratio: The difference between the observed Meth Lab Density (MLD) and the expected MLD.  Below is the SR equation to help visualize and explain its definition.  
[ SR = (observed MLD - expected MLD) / √ expected MLD] 

But what does SRs Mean?  The SR is a measure of the strength of the difference between observed and expected MLD values.  After running the OLS tool, it automatically generates a residuals map that I would often review to quickly see if the selected variables helped or hurt the model (the more yellow the better).  In addition, the structure of the map was also helpful in analysing the results of running OLS.  A good model would show a dispersed layout of over and underpredictions.  Looking at the legend of the map below, the orange to red range represents over prediction, meaning the model equation predicts more MLD than actual.  The gray to blue range represents under prediction, meaning the model equation predicts there is less MLD than actual.  There may be a little clumping shown in the map below, but the SR layout/structure is mainly dispersed across the study area, which indicates a good model.  Could it be better?  Absolutely!!  Actually, as I looked at this map, I realized that the handful of observations outside the two main counties (Putnam and Kanawha) could have been the outliers that prevented my model to score higher.  I really wish I noticed this earlier.  I should have tried running my model on just observations made in Putnam and Kanawha counties.  Then maybe my model would have been closer to 1.0.

In summary, this project demonstrated how to better understand some of the factors contributing to the spread of Meth Labs in a few West Virginia counties, by using Ordinary Least Squares (OLS) regression to limit the 29 candidate factors to a subset of 7 factors. The scatterplot matrix tool was used to improve the model by exploring the histograms of candidate explanatory variables that might improve the model. I also noted the Koenker test was statistically significant meaning a switch to using the GWR could result in an improved regression model. When executed successfully, regression analysis could provide a community with a number of important insights to help uncover more meth labs.

References:

  • ZedStatistics, https://www.youtube.com/watch?v=aq8VU5KLmkY&t=558s
  • MathBits, https://mathbits.com/MathBits/TISection/Statistics1/LineFit.htm
  • Interpreting OLS results, http://desktop.arcgis.com/en/arcmap/latest/tools/spatial-statistics-toolbox/interpreting-ols-results.htm
  • AI & Machine Learning, https://www.youtube.com/watch?v=KCkGif6wSMo

Statistics Module 3a Prepare Data


This week begins a new Project focused on Statistics and issues that are both social and economic, socioeconomic.  The setting is the familiar rolling hills and dense forests of West Virginia (WV).  The study area is Charleston (County Seat), WV including five counties: all of Kanawha and Putnam and 3 extended counties, Clay, Boone, and Lincoln.  The number crunching involves various types (social and economic) of data: population, salary, poverty, Crystal Meth Labs.  The Project goal is a scientific report explaining the results of an analysis that uses GIS to show the facts and figures surrounding a cultural issue, crystal meth.  This week's goal will focus on writing the Introduction and Background sections of the final report.  The lecture involved the following: lecture video and various readings: A Weisheit and Wells article and writing guide were aides used to complete this week's assignment.  The Lab was a five-step exercise that resulted in the map described in summary below.  Here were the five steps:

  1. Obtain the data provided by UWF from Repository drive
  2. Review the data
    1. Busted Meth Labs, point feature class
    2. Census Tract data, polygon feature class
  3. Prepare the Census Data
  4. Join Meth Labs to Census Blocks
  5. Create basemap to augment the provided data


The end Goal (Why) for this project is twofold:
  1. Exposure to ArcGIS Spatial analysis Tools and common methods and learn to apply them to solve real-world problems
  2. Exposure to examining peer-review literature and applying those methods and techniques to a similar project.  

The weekly Objectives (What) were as follows:
  • Write an Introduction section of a final report paper
  • Write a Background section of a final report paper
  • Create a basemap to act as an underlayer to Busted Meth Labs and Census Tracts
  • Start understanding linear regression and establish a visual of this predictive type of analysis

What was learned/remembered this week?
The Shake and Bake process of making Meth may be the easiest to perform, but it is an extremely dangerous game to play!

The process of using independent data (socioeconomic variables) to make predictions based on dependent data (Meth Lab seizures) involves the work that we will be performing and reporting on during this Statistics project.

What was challenging this week?
Understanding the gist of this project in a visual way my biggest challenge this week.
The image below helped me visually refresh my basic understanding of linear regression.
It sure has been a long time remembering the difference between explained deviation (SSR) and unexplained deviation (SSE).  For me, a line of best fit is a good way to understand regression.


Any Weekly Positives?
In a big-picture way, I have a basic understanding of predictive analysis.

In Summary, the main feature in the lab experiment was showcasing the busted meth lab (BML) locations, which was spatially joined with 2010 Census county boundaries.  The Main Study area was created by selecting the two main counties and exporting then off as a separate layer.  Both the BML and Census Layer were provided in this week's lab exercise; and there are sources from US DEA National Clandestine Laboratory Register and Tiger/Census data.  I also created the Extended Study Area to show a parent relationship of all counties (Putnam, Kanawha, Lincoln, Boone, Clay) containing a BML.  To create the basemap, I searched and downloaded the following ancillary features: Incorporated Places (Major Place), which were originally polygons that I converted to points using the feature to point tool and then adding a definition query to filter on features with units greater than 1500; Interstate & US Routes where originally created by WV DOT and derived from Statewide Addressing Member Board (SAMB) 2003 aerial photography.


Songs of the Week

  • Breaking Bad Song of the Week is by the late Johny Cash - "Hurt"
  • Inspired by the Dangerous/Wicked game of making Meth: "Wicked Game" by Chris Isaak
  • When searching the internet with Meth and WV as keywords, Mini Thin SEO scores high.  I never knew this author until now.  He is known as a "hick hop" rapper and raps about life in West Virginia, where crystal meth, moonshine, and Oxycontin are part of the culture. 
    WARNING: his content is Graphic and Heavy language
    • "Meth Labs & Moonshine" from the album "Hillbilly Hustle"

References:
• ZedStatistics, https://www.youtube.com/watch?v=aq8VU5KLmkY&t=558s
• MathBits, https://mathbits.com/MathBits/TISection/Statistics1/LineFit.htm


Friday, October 5, 2018

GIS4930 - Module 2: MTR (Report Week) | Broken Landscape & Feelings

During the last three weeks, I've been reminded of a childhood pollution commercial of a crying Indian (Iron Eyes Cody) that was used as an emotional symbol for a Keep America Beautiful (KAB) organization.   The goal of this original project was to reduce highway litter through a public service announcement (PSA) campaign.  For me, the emotional equivalent for Mountaintop Removal (MTR) has been many documentaries and movies portraying West Virginia natives who at an early age left home, moved on to find life, jobs, themselves, and just do the best they can.  There were other stories of native West Virginians that knew where their home was and stuck it out living with a brokenness inside them as they resisted big business (Coal Industry) and politics from breaking their health, memories, and landscape.  I usually wait to the end to share a song of the week.  This week I’m going to first share a song that has struck a chord with me over the course of this project.   The song is by Miranda Lambert, “The House That Built Me”.   


As I've listened to this song over the past weeks, I made the connection of broken feelings and broken landscape.  I can’t help wonder if a few Appalachian natives feel they can’t ever go home to the same place they remember growing up.  Fortunately, they have their memories, but at the same time have broken feelings inside.  


MTR, Broken Landscape & Feelings ...


Goal (Why):
Here we are at the final milestone (Report Week) of the MTR Project.  Looking at the list of objectives below, I'm reminded of a Project Managment process called Project Closeout that strives to assess the project, ensure completion, and derive any lessons learned to be applied to future projects.    
Because Project Planning has been an important part of working through the MTR project, I've chosen Project Management as the theme for this week.  Earlier I briefly mentioned, "Lessons Learned".  I personally have discomfort for this term.   I find these two words at odds with each other.   For me, the word "lessons" suggest something that is known (somehow) which can be taught/conveyed to other people.  Constructing meaning from so-called project lessons is a challenge for me.  I feel we all construct meaning differently.  We can socially assemble stuff (documents, software, internet searching) to construct meaning or we might attain meaning through facts and information alone.  I'm attempting to make connections of constructing meaning from observations derived from the MTR project.  Actually, I want to suggest a "turn blind eye" concept.  Something should be done to prevent more harm and destruction inflicted by the industrial age, coal dependency, and MTR mining.   

Objectives (What):
  •  Convert reclassified MTR raster to polygon 
  •  Perform an analysis accuracy test using random points 
  •  Conduct a comparative analysis of 2010 MTR data with the 2005 dataset 
  •  Create and share layer packages 
  •  Compile group data into single layer package for group study area (group leaders only). 
  •  Using ArcGIS Online UWF Organization account 
         - Publish MTR Analysis results as a feature service and web map using
  •  Closeout: including 5 deliverables
      - 1. Final MTR Layer
      - 2. Create Package from final MTR Layer map document
      - 3. Complete Process Summary
      - 4. ArcGIS Online Group MTR Analysis Map
      - 5. Link Final Journal Story Map to this Blog 
  •  Convey Project lessons

So what are we going to do with last week's accomplishments this week?

This week is a continuation of last week’s analysis week.  More processes that flow together via inputs and outs.  The input is last week's reclassified image.  To the left is a basic black box diagram. The details of the Process box were explored in this week's three-part lab.  
     Part 1: Edit and Package Reclassified Raster Data (5 Steps)
     Part 2: Publish Group MTR Analysis map on ArcGIS Online UWF Org (5 Steps)
     Part 3: Finish Final MTR Story Map Journal and Blog Post (3 Steps)

So what actually happened during this weeks analysis phase?
Below are some of the GIS tools we used to transform and produce this week's deliverables.
-  Part1, Step 1: Conversion Tools > From Raster > Raster to Polygon. 
-  Part1, Step 2: Analysis Tools > Proximity > Buffer 
-  Part1, Step 2: Analysis Tools > Overlay > Erase
-  Part1, Step 2: Data Management > Features > Multipart To Singlepart
-  Part1, Step 3: Data Management > Sampling > Create Random Point
And below are the two last parts of this busy week
-  Part 2, Publish Group MTR Analysis map on ArcGIS Online UWF Org
    • Make a hosted Feature Service, which I consumed in a web map

-  Part 3, Finish your Final MTR Story Map Journal and Blog Post.


What was learned/remembered this week?
  • Coal, a present from the Mesozoic to the Industrial Age, does harm where it is burned, and where it is dug.
  • Coal use also has some consequences: fossil fuel dependency, environmental costs, human costs, government responses, protection of a coal-miner way of life.
  • MTR inflicts a wound that goes deep and lasts a long time and the scars are very visible.

What was fun and or challenging this week?
Exploring modern cartography design and the era of collaborative GIS was fun and challenging in a creative way.  The mindset associated with these web maps feels different than the static maps I'm used to creating.   Having access to professionally produced basemaps creates a digital canvas that makes storytelling fun.  And learning about Hosted Features and publishing hosted feature layers was a fun section of the lab.  

To the right is a screenshot of an On-Line Esri map that I created using am MTR Hosted Service I created previously.  I planned this map during week one (Data Prep) when I created 4 individual shapefiles for each Group 1 Team member, making sure each layer intersected corresponding Landsat image. I planned to be able to zoom in/out and see the team member that performed the analysis.  Creating labels and adjusting when they are visible was pretty easy.  The whole experience of using ArcGIS OnLine by Esri was fun to explore.  I'm glad we had the extra time to complete this part of the project. Visit the Final MTR Layer map here  (http://arcg.is/1jKPve0) to explore the Group 1 study area.  Be sure to zoom in to see the label popup.

I tried making unsupervised classification a fun experience, but right now that is still a challenge for me.  So I revisited the task of unsupervised classification this week to get some more experience and try to make my MTR Layer larger by marking more of the suspect classes as "MTR".   I still struggle with this task.  
I wish there was a learning video provided to show us how to properly do this task.   I did find some helpful ERDAS Geo-Spatial Tutorials on the youtube channel.  Here is one of those helpful links from a Geospatial Enthusiast that has an embedded video.  
This online resource had a Notes and Tip section that I found helpful.  Clicking the brown Notes and Tips image to the right will take you directly to the resource.


Any Weekly Positives?
We can't undo the past, but we can do something about tomorrow.  And here are a few places that have taken a pledge toward carbon neutrality:  British Columbia (Canadian province),  Costa Rica, Iceland, Maldives,  Norway,  Tuvalu
Sweden, New Zealand, Vatican City.
For a list of more countries striving NOT to follow in the footsteps of fossil fuel dependency, see this link.
https://en.wikipedia.org/wiki/Carbon_neutrality

Costa Rica has just ran on 100 percent renewable energy for 300 days!! Awesome 😊
http://vt.co/sci-tech/innovation/costa-rica-just-run-100-percent-renewable-energy-300-days/


In Summary, this week we utilized several GIS tools to transform a raster file into vector files and used them in a cloud-based GIS mapping platform hosted by Esri to explore modern cartography.  While technology may make it easy to help convey a damaging process like MTR.  We see time and time again that political power can over-turn the right thing to do for our current and future generations.
Putting the technology to the side, I feel it is pretty obvious that MTR mining is wrong for so many reasons and has been wrong for a long time.  And the images and analysis have been presented time and again.  It's time to hold the coal industry accountable for their past and future actions on mother earth.

Please visit my Journal Story Map that attempts to capture the highlights of this MTR project.  And here is my GIS Blog link that I plan to update into the future.


I depart with a few thoughts to ponder.  

  • How would the world be different today if the reliance on fossil fuels were not so deep?  
  • What if knowledge and technology existed around 1860 to exploit a cleaner energy source rather than harnessing the power of ancient suns (peat, the forgotten fossil fuel)?  
  • Could Pollution events like the Great Smog of London in 1952 have been avoided if we learned from the past?  
  • Why did it take so long to understand and take action on past lessons from exploiting and burning coal?

Yes, it's sad that the ignorance of the industrial age inflicted soo much harm and destruction.  But it would be far worse if there where no lessons conveyed.  Some countries can see past the politics and make the right decisions with future generations in mind.  There needs to be a mindset change before the US can start to remove fossil fuels from its traditional way of life.  We can't undo the past, but we the people can do something about tomorrow.  

Project Management (PM) Song of the Week
As a project manager, some time things tend to get out of your control. Even with lots of planning, track budgets, and assign tasks, all you can do is sit back and hope to hear some good news.   And with that in mind, I chose "Tell me something good" by Rufus & Chaka Khan for this weeks PM song of the week.  https://youtu.be/cm_cFzVAoo8


Interesting Tidbits

Iron Eyes Cody (born Espera Oscar de Corti, April 3, 1904 - January 4, 1999) was an Italian-American actor.

Beverage and bottling companies (Anheuser-Busch, Pepsi, Coca-Cola, McDonald's, etc.) sponsored the KAB, Iron Eyes Cody Ad Campaign mentioned above aired on Earth Day in 1971.   Hmmm, maybe their bottles were part of the litter problem??  

For more info on KAB, see https://www.sourcewatch.org/index.php/Keep_America_Beautiful


References:
•  http://desktop.arcgis.com/en/arcmap/latest/tools/cartography-toolbox/simplify-polygon.htm
•  Tell me something good - https://youtu.be/cm_cFzVAoo8
•  Focus Music - https://www.youtube.com/watch?v=5LXhPbmoHmU
•  https://en.wikipedia.org/wiki/Iron_Eyes_Cody
•  https://www.youtube.com/watch?reload=9&v=DQYNM6SjD_o


Thursday, September 27, 2018

GIS4930 - Module 2: MTR (Analysis Week)

Goal (Why): Analyze 2010 Landsat data to identify signs of MTR in the Appalachian Coal Region of West Virginia and surrounding states.

This week I changed my process a little bit.  I'm spending more time upfront planning, working on a project mindmap/process map, laying out my blog, and just trying to plan and define what I'm going to do up front before jumping into the lab.  I associate Project Objectives as the what is planned to accomplish the project goal/deliverables.  I'll be updating this Objective section as I jump each hurdle during this week's efforts.  You guessed it, this week the theme is a track & field relay race.

Objectives (What):
  • Complete Analysis Lab
    • Explore data in ArcMap
    • Further, explore data in ERDAS IMAGINE
    • Analyze Group 1 Landsat Image
      • Step 1 Prepare your Landsat image for analysis - L2010_p17r33.img
        • Use the Composite Bands tool to create a single raster dataset
        • Use the Extract By Mask tool to clip to basin raster
      • Step 2 Conduct Unsupervised Image Classification - clstr_2010_50_md.img
      • Step 3 Reclassify imagery - Rclss_p17r33.img
      • Step 4 Update MTR Story Map Journal
    • Look ahead: Anticipate how to present/report on this week's endeavors and envision what some next steps might look like.
  • Complete process summary
  • Screenshot of Reclassified MTR raster
  • Finalize this blog and Update MTR Story Map Journal Click Here 
    • https://pns.maps.arcgis.com/apps/MapJournal/index.html?appid=d020fe9fd64d490dba2f3c64b856e596


Here we are at the start of week 2.  I decided to crop out a portion of my project mindmap to highlight the handoff of week 1 to week2.  This handoff is analogous to a python method passing its output to another method.  The diagram on left attempts to illustrate week 2 accepting as input week 1 output (DEM, Streams, and Basins).  You can also see the reference to a python script using two library toolsets (Mosaic and Hydrology) to generate three spatial outputs, which are inputs for week 2.  I tried to capture the gist on week 1 handing off its payload to week 2.  This handoff is very similar to a smooth baton handoff related to a track relay handoff as shown in the image on right.


So what are we going to do with last week's accomplishments this week?  Last weeks deliverables are not the subject of analysis this week.  However, the output boundaries produced from last week could be used as a window to view this weeks image classification.  This week we continued to look for signs of mountaintop removal using another type of image, Landsat image.  The tools for performing Landsat image inspection are ERDAS Imagine and ArcMap 10.6.1.   Recall that the overall study region was divided into multiple groups. I'm still a member of group one.  The area that my group has been assigned is broken down into several Landsat rasters.  I analyzed one raster, L2010_p17r33.img, as my portion of the assigned work while other members worked with another raster. Being mindful of visually determining evidence of mountaintop removal, image analysis via unsupervised image classification, creating a new cluster property (Class_Name), and assigning Class_Name a new value ("MTR" or "non-MTR") was the focus of this week.   Below is a reminder of the study region I created from last week post.

So what actually happened during this weeks analysis phase?  Well for starters, getting reacquainted with ERDAS Imagine was an arduous task this week.  This feeling was reminiscent of last week went I was starting to use Idle to review the starter template script.  After jumping this first hurdle (ERDAS) next was remembering past lessons learned from a remote sensing class regarding the classification of images.  The next series of hurdles involved understanding the basic types of image classification: what's the difference between a supervised and unsupervised image classification?   After some internet searching, I was quickly back on track at a high-level.  Basically, unsupervised image classification is calculated/guided by a software clustering algorithm (no landscape training required) and supervised classification is human-guided image classification requiring landscape training by a human to help inform the computer algorithm to understand the landscape.  Well, that's how much of this week went, remembering the past as I processed each step of this week's lab instructions.

Exploring this week's Classification/Reclassification endeavors


The image to the right depicts this week's deliverable outputs.  My plan for this map was to show how last week's boundaries intersected this weeks analysis.  So, I'm using color on top of a grayscale background to hopefully show the area of interest this week.  The red bound extent area with white background depicts the Landsat image I investigated this week.  Each pixel in this area was examined with ERDAS Image using an unsupervised classification process that sorted the pixels into fifty fixed clusters.  Via lab instructions we set the number of clusters to fifty.  This classification method examined all Landsat image pixels and based on each pixel’s spectral reflectance value, all the pixels were sorted into fifty different colored clusters.  Then I examined the image in known areas of MTR and further defined these clusters with a custom property (Class_Name) and assigned a value of “MTR” and assigned a color of red.  For all other Clusters, I set the value of Class_Name to “non-MTR” and assign no color.  The Class_Name field will provide an easy way to query all pixels associated with MTR, which will be important later when we want to clip/mask the entire extent of the image to a smaller region, Group 1 Study Area.  Note that the majority of my Landsat image, "P17R33", is outside the area of interest (AOI) of the Group 1 study area.
When I zoomed in close to inspect known areas of MTR it was obvious by panning around that not all suspect clusters were valid MTR sites.  Authentic MTR areas are a type of urbanization (big machines were used to modify the landscape).  Hence, it’s important to remember that not all red locations classified as "MTR" are true MTR sites.
Let me repeat to be very clear, all red clusters are NOT valid locations of MTR.
Unsupervised classification does not include any type of landscape training so other types of urbanizations (roads, building, lot clearing) will obscure the identification of valid MTR clusters.  And there will be other types of atmospheric inference (clouds, moisture, etc.) that will further complicate the identification since various types of interference will have similar spectral reflectance traits common to real MTR locations.  So be mindful of urbanization and various types of interference when viewing this map.  I don't want to mislead the map viewer to feel that all this red is associated with valid MTR mining.  On the contrary, these red clusters are merely the results of unsupervised classification and this area are suspect locations of MTR that will require ground truthing to verify as true clusters of real MTR locations.
To the left is a close look at my Group 1 region.  Linear regions are easy to infer as roadways, but it’s difficult to truly identify legitimate MTR locations.  I’ve highlighted two regions that are authentic MTR Clusters.  Visit next week as we continue the search to discover evidence of MTR mining as the various types of interference is stripped away.


What was learned/remembered this week?
This week was definitely a flashback to the Remote Sensing course of yesteryear.  Relearning the two common types of image classification was the remarkable hurdle this week.

What was fun and or challenging this week?
Grayscale maps still continue to be fun.  They lend to making the area of interest take center stage.  And the not so fun thing this week was making sense of unsupervised classification.  It was tough getting started with ERDAS IMAGINE, but I managed to plow through it.  I'm sure with more practice, this task would become fun someday!

What were some Weekly Positives?
Completing the Landsat image classification using unsupervised classification was definitely a positive.  But a subtle positive awareness discovered this week was the observance of putting information into a system, then doing something with that input to produce an output.  We see this basic model everywhere.
Visualizing the importance of input-process-output (IPO).
This simple model is so subtle it is easily overlooked.  But when you're looking for it, it's a common underlay in many technical and non-technical (economic) processes.  Take for instance coal as in input for the steel industry and steel as in input for the coal industry.  And possibly the car industry requiring both coal and steel as inputs to output cars.  Here we see the goods of downstream industries producing inputs for further use in producing final goods (outputs).  IPO is ubiquitous, it's used in many aspects of life if you look close enough.  Its the basic model for processes to follow.

In Summary, the main objective this week was to create a reclassified raster using a combination of ERDAS Imagine and ArcMap to identify areas of suspected MTR.  Now that we have completed two-thirds of this MTR Project, its time to take a look ahead for the final week, envisioning a final presentation that reports our MTR mining findings.  Below is an outline of high-level objects for next week.

  • Convert MTR raster to polygons using Raster to Polygon (Conversion Tool)
  • Remove MTR areas that are smaller than a given acreage.
  • Create buffers around roads and rivers, removing MTR areas that fall within those buffers.
  • Perform an accuracy test using random points on your map.
  • Compare your 2010 MTR data with the 2005 dataset.
  • Package your dataset for your group leader.
  • Compile group data into a single dataset for group study area (group leader only).
  • Create map service presenting your group findings with ArcGISOnline, UWF Organization.
Song of the Week
My relay-race playlist looks like this.
 Cruise - by FL GA Line

And first pick was Cruise by FL GA Line:
https://www.youtube.com/watch?v=8PvebsWcpto

Off topic, another favorite of my by FL GA Line is Simple
https://www.youtube.com/watch?v=3GeaYy6zlXU


References:
• https://articles.extension.org/pages/40214/whats-the-difference-between-a-supervised-and-unsupervised-image-classification
• https://gisgeography.com/image-classification-techniques-remote-sensing/
• https://gisgeography.com/supervised-unsupervised-classification-arcgis/
• https://www.youtube.com/watch?v=8PvebsWcpto

Thursday, September 20, 2018

GIS4930 - Module 2: Mountain-Top Removal (Prepare Week)

During the first week of Mountain-Top Removal (MTR), data preparation was the primary goal and the following were the accomplished objectives:
  • Watch Lecture video of Amber interviewing John Amos, creator of SkyTruth
  • Understand the Study Area & What to deliver this week
  • User Mosaic raster toolset to create a mosaic dataset
  • Use ArcMap's Hydrology toolset to create stream and basin spatial data
  • Fix a python script template to automate the creation of Mosaic and Hydrology features
  • Create a basemap using outputs of Mosaic raster and Hydrology toolsets
  • Create Blog and iteratively update using Demming Cycle: plan-do-study-act
  • Create an MTR Story Map 
  • Create an MTR Journal 

The map on left illustrates the study region for Project 2: MTR spans five state borders: Ohio, West Virginia, Virginia, Tennessee, and Kentucky.  This region has an area of approximately 77,904,706,396 Sq m (~19,250,672 Acres).  Members of Group 1 worked with data associated with this eastern area as shown on the map to the left.  I downloaded all the basic US States from an ESRI site that is referenced below to make this simple map to highlight the Study Region.


The map on the right is a copy of a working map document I created to troubleshoot a standalone python script that automated the process of creating a mosaic raster dataset and creating hydrology spatial data (streams and basins) from a Digital Elevation Model (DEM).  I started with passing 4 DEM rasters assigned to Group 1 into the Mosaic raster toolset.  In the python script, these 4 DEMs where expressed in an array that was passed to the MosaicToNewRaster_managment method.  And the output of this method would then be passed to another tool (ExtractByMask) that masks/clips the raster to the boundary of the Group 1 study area.    This new masked raster has a set of elevation data ranging from  1435 - 156 meters as you can see from the legend (darn, looks like I forgot the reference to meters in the legend).  This new range of elevation data in the new DEM Raster was then used by the hydrology toolset to generate streams and basins by running a set of tools where the output of each tool feeds the next method.  Again, this tool/method execution (call stack) was very obvious in the script and nicely commented as step 4 - 10.  Fixing the script was really just a plumbing task of creating the appropriate file paths to keep the inputs and outputs from colliding as each tool passed their outputs to the next tool.  I added an inset map to make reference to the study region shown as a purple boundary. The red colored area is the Group 1 work area I analyzed this week.  The Hydrology toolset did all the work of generating the streams and basin features. The python script made this weeks data preparation very fast and efficient.  The boundary features where provide in this weeks project data.  And the ESRI basemap was added via ArcMap 10.6.1.  The state boundary features in the inset map I downloaded from Census Tiger files.

What was learned this week?
Getting the python script to work was a little tricky at first, but once I got into troubleshooting the script and got all my variables set to my planned file paths, the script quickly started behaving and stopped complaining soo much.  The old meme is true: "If you don't use it, you lose it".  But there is a remedy, start using the old skillset.  There might be a little dust on your bottle of python knowledge, but once you brush off the cobwebs, you might be surprised about what's inside (which reminds me of an oldie but goodie song from David Lee Murphy - http://www.davidlee.com/music/song-lyrics/out-with-a-bang-lyrics/dust-on-the-bottle/)


What was fun this week?
The fun things this week were story maps, getting the python to behave, experimenting with those light grey base-maps, and learning about the Mosaic and Hydrology Toolsets.  I found a short YouTube video that helped me get started understanding the Hydrology Fill method, sinks, and headwaters (see reference link below).

What were some Weekly Positives?
 SKYTRUTH - https://www.skytruth.org/
 SKYTRUTH helps the masses see the change so citizens can participate to help CHANGE IT.


In summary, this week was an eye-opening experience of the coal industry and the MTR process.  I liked exploring and getting started with Story Mapping and this weeks python script was a good python reminder experience.  At first, getting started with the script template was challenging.  It was a long time since I last cracked open a python editor.  I started with understanding what the script was meant to accomplish and first created a working map document with all my planned empty folders for my script to dump the generated features.  I stuck with the basics of wrapping all method calls with verbose print statements and walked the call stack until I resolved all script errors.  I then used my working map document to visualize the expected features: Raster (DEM), streams (line), basins (polygon).  The top-down execution of method calls in the python script made it easy to follow the logic and workflow of data manipulation this week.
Finally, I reused the working map document.  I created a new map document by copying my working map document.  After a few edits and applying all the map essentials, I was able to quickly create the map displayed above.  This weeks course material is starting to get easier to decipher and I'm starting to develop a rhythm to complete weekly assignments and getting reacquainted with searching and downloading GIS data.

References:
• http://desktop.arcgis.com/en/arcmap/latest/manage-data/raster-and-images/defining-or-modifying-a-raster-coordinate-system.htm
• http://desktop.arcgis.com/en/arcmap/latest/tools/spatial-analyst-toolbox/an-overview-of-the-hydrology-tools.htm
• https://www.arcgis.com/home/item.html?id=f7f805eb65eb4ab787a0a3e1116ca7e5
• https://www.youtube.com/watch?v=0D5kG6_3rTI
• http://www.davidlee.com/music/song-lyrics/out-with-a-bang-lyrics/dust-on-the-bottle/